
task
Order Details Page
Last updated July 21, 2026
The Order Details page is where you:
- Review product and customer information
- Monitor production progress
- Create shipping labels
- Mark orders shipped
- View pricing and profit breakdown
- Add notes
- Cancel orders
If the Orders page is the dashboard, this is the cockpit.
---
Order Header
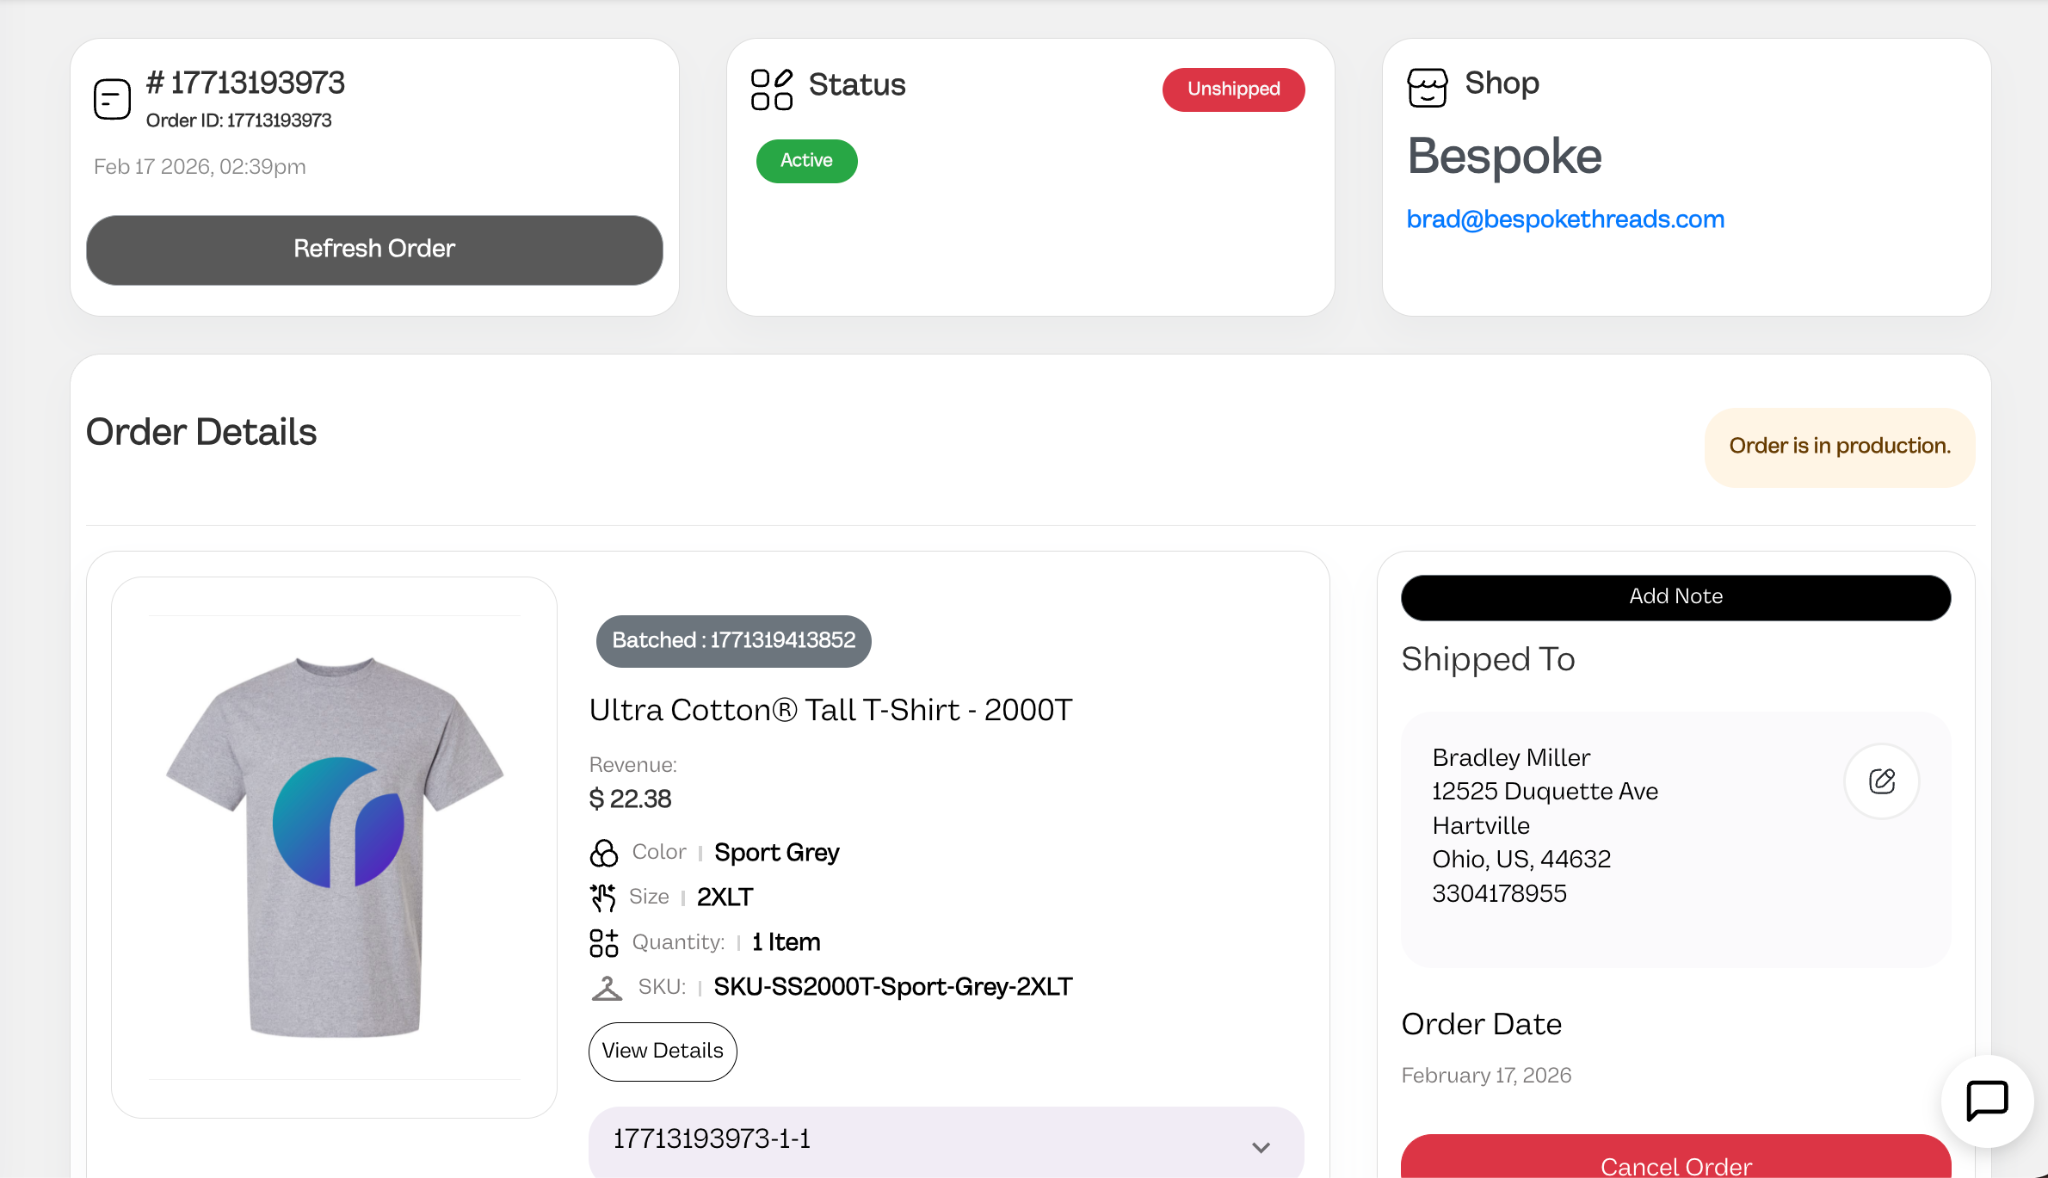
At the top of the page, you’ll see:
- Order number (#17713193973)
- Internal Order ID
- Order date and time
- Store name and email
- Status indicators
- Refresh Order button
Refresh Order
Use Refresh Order to:
- Pull updated data from the connected store
- Sync any changes made externally
This does not remap products — it simply refreshes order data.
---
Status Indicators
You will see two main status indicators:
Order Status (Green Badge)
Example: Active
Indicates whether the order is valid and in workflow.
Fulfillment Status (Red Badge)
Example: Unshipped
Indicates whether the order has been shipped.
These update automatically based on system actions.
---
Production Status Timeline
The timeline shows:
- When the order was created
- When it was sent to production
- When it was shipped
This is auto-generated and cannot be manually edited.
It provides a production audit trail.
---
Order Items Section
Each item includes:
- Product image
- Product name
- Revenue for that item
- Color
- Size
- Quantity
- SKU
- View Details button
- Batch ID (if batched)
Batched Badge
If the item has been batched, you’ll see:
Batched: [Batch ID]
This means:
- The item has been moved into production
- It is assigned to a specific batch
If no batch badge appears, the item has not yet been batched.
---
Revenue & Pricing Breakdown
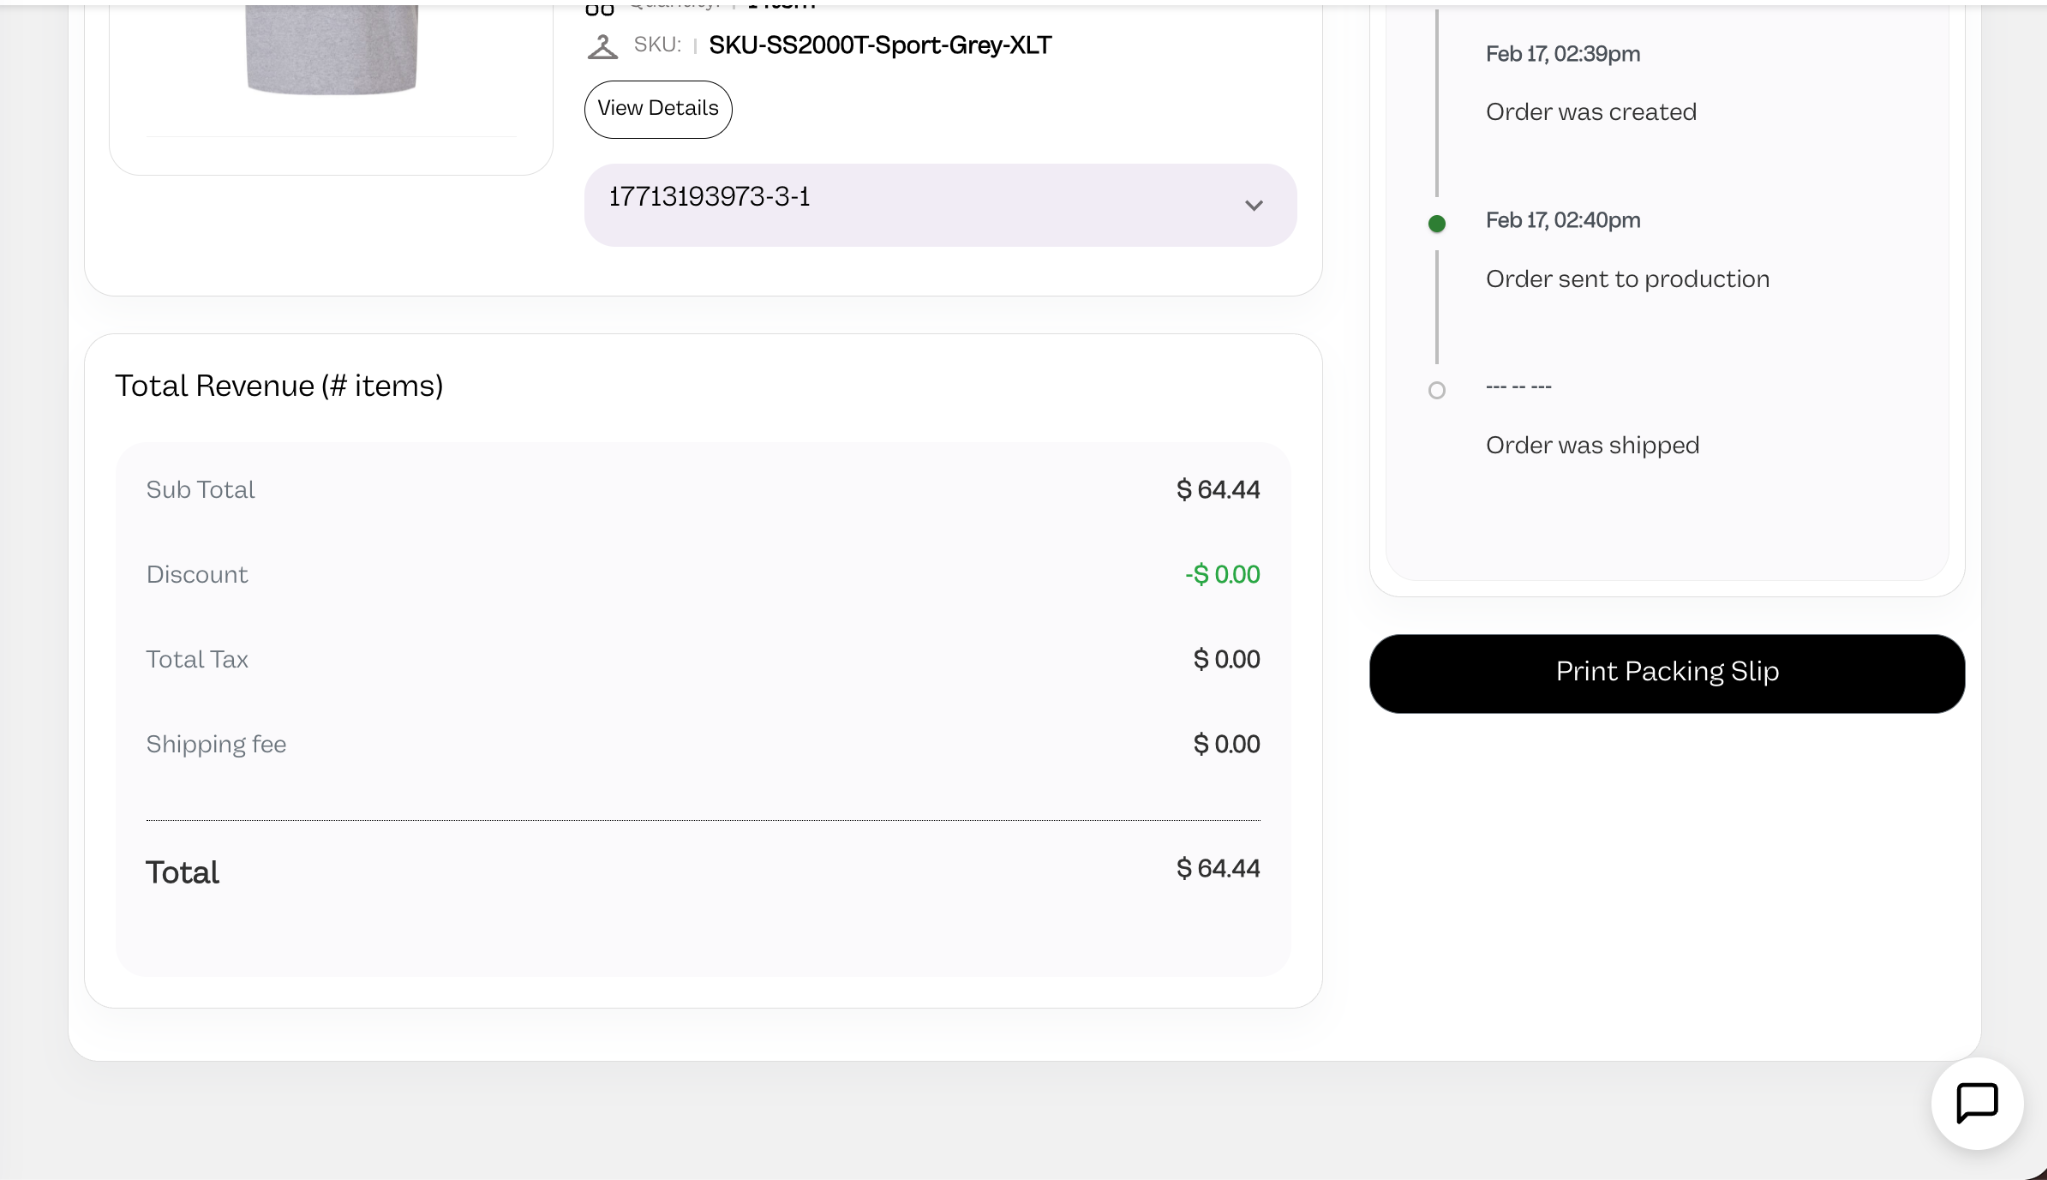
This section shows:
- Subtotal
- Discount
- Tax
- Shipping fee
- Total
This reflects what your customer paid.
On the right side, you’ll see:
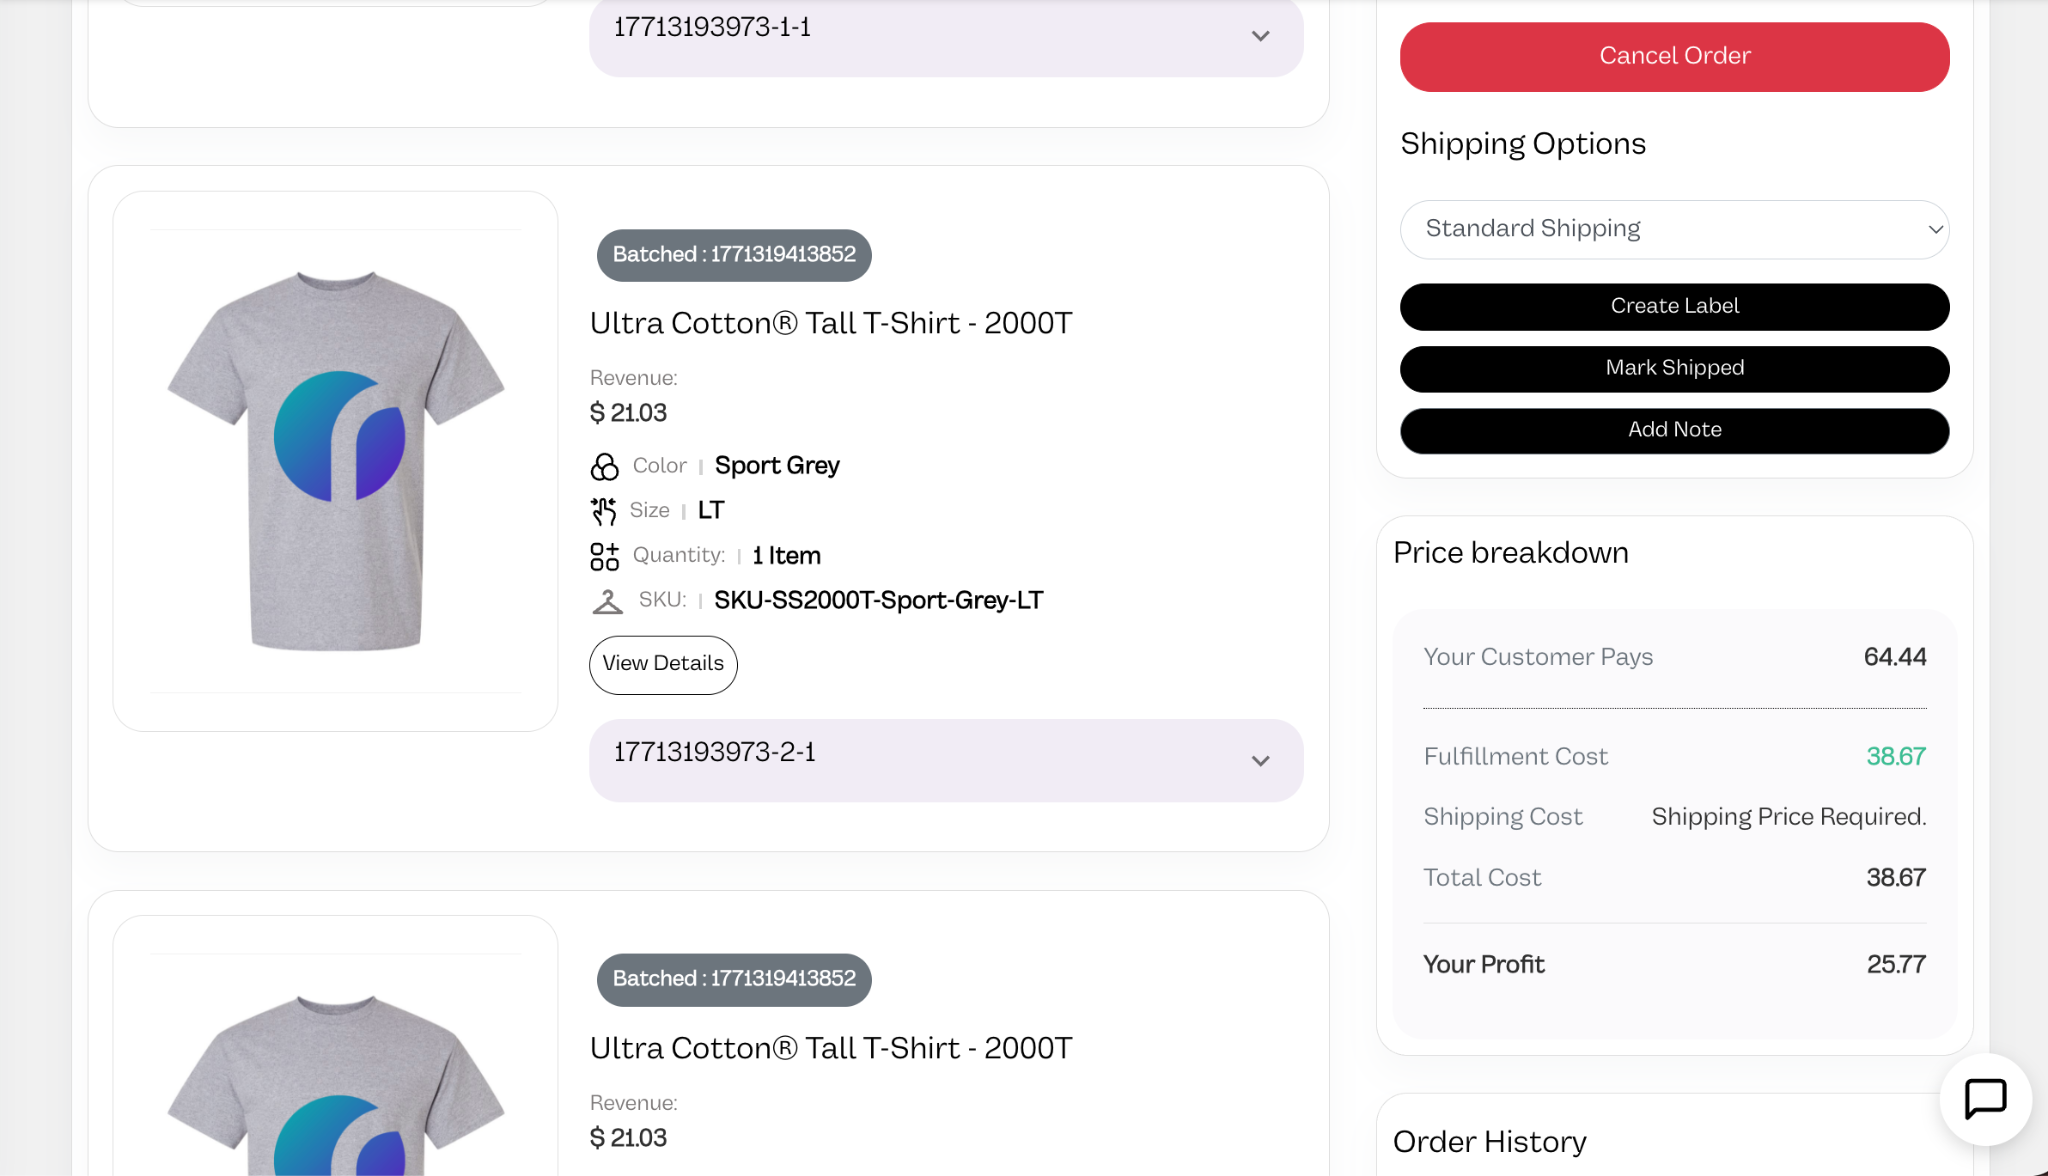
Your Customer Pays
The total collected from your customer.
Fulfillment Cost
What production costs you.
Shipping Cost
Carrier cost for label creation.
Total Cost
Production + shipping.
Your Profit
Customer payment minus fulfillment + shipping costs.
This gives immediate visibility into margin per order.
---
Shipping Controls
This section allows you to:
- Select shipping speed
- Create shipping label
- Mark order shipped
Create Shipping Label
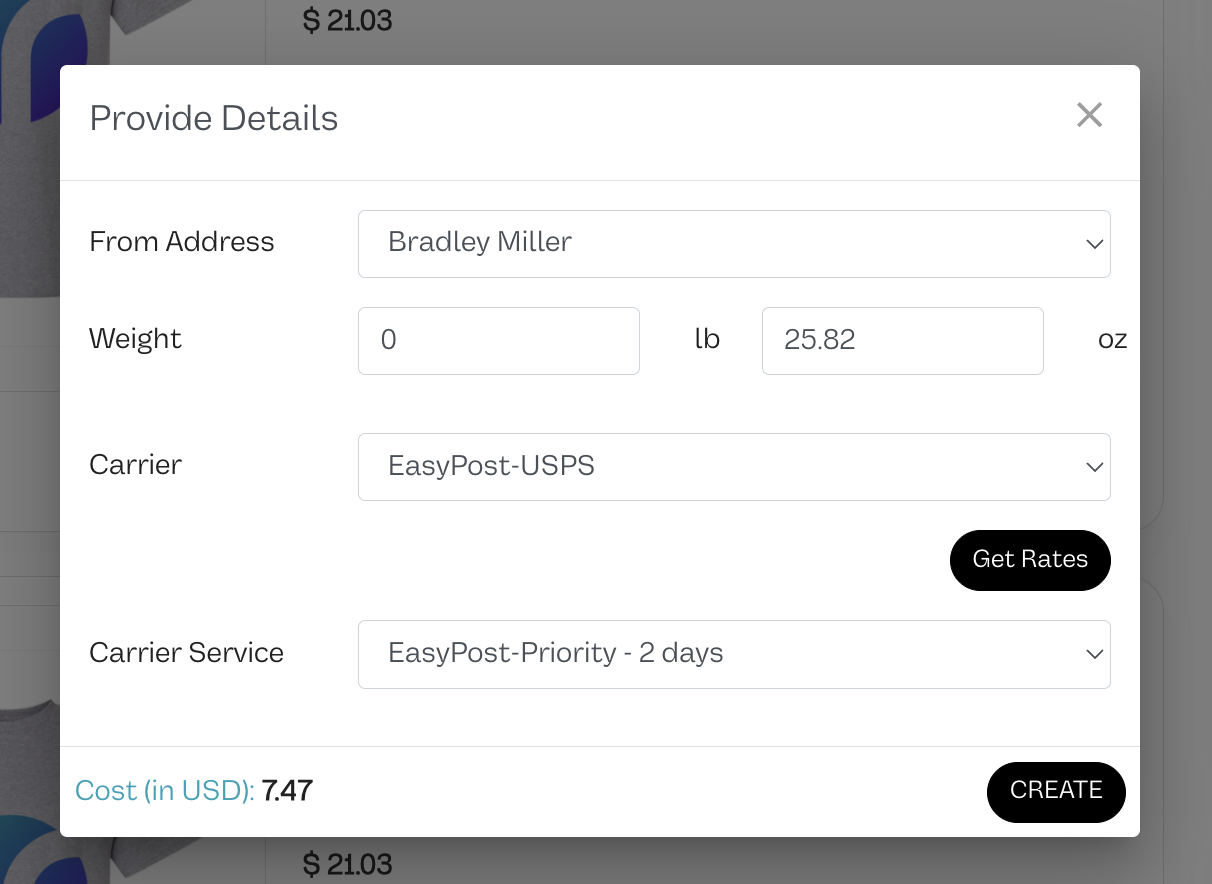
When you click Create Label, a shipping modal appears.
This allows you to:
- Confirm the From Address
- Enter or adjust the package weight
- Select the Carrier
- Click Get Rates
- Choose the Carrier Service
- Review the final shipping cost
Once you click Create:
- The shipping label is generated
- The label is attached directly to the order
- Tracking is automatically saved to the order
- Tracking is pushed back to the connected ecommerce platform (Shopify, Etsy, etc.)
- The order fulfillment status updates accordingly
There is no need to manually copy tracking numbers.
Everything is handled automatically.
---
What Happens Behind the Scenes
When the label is created:
- Shipping cost is recorded.
- The cost updates the Profit calculation.
- Tracking syncs to the store.
- The order timeline updates.
This ensures:
- Accurate accounting
- Automatic customer notifications (via the connected platform)
- Clean fulfillment tracking
Mark Shipped
Use this if:
- You created the label externally
- You shipped manually
- You need to update tracking manually
Marking shipped:
- Updates order status
- Syncs tracking to the connected store (if integrated)
---
Print Packing Slip
Clicking Print Packing Slip generates a printable document that includes:
- Order number
- Customer info
- Item details
This is separate from shipping labels.
---
Shipping Address
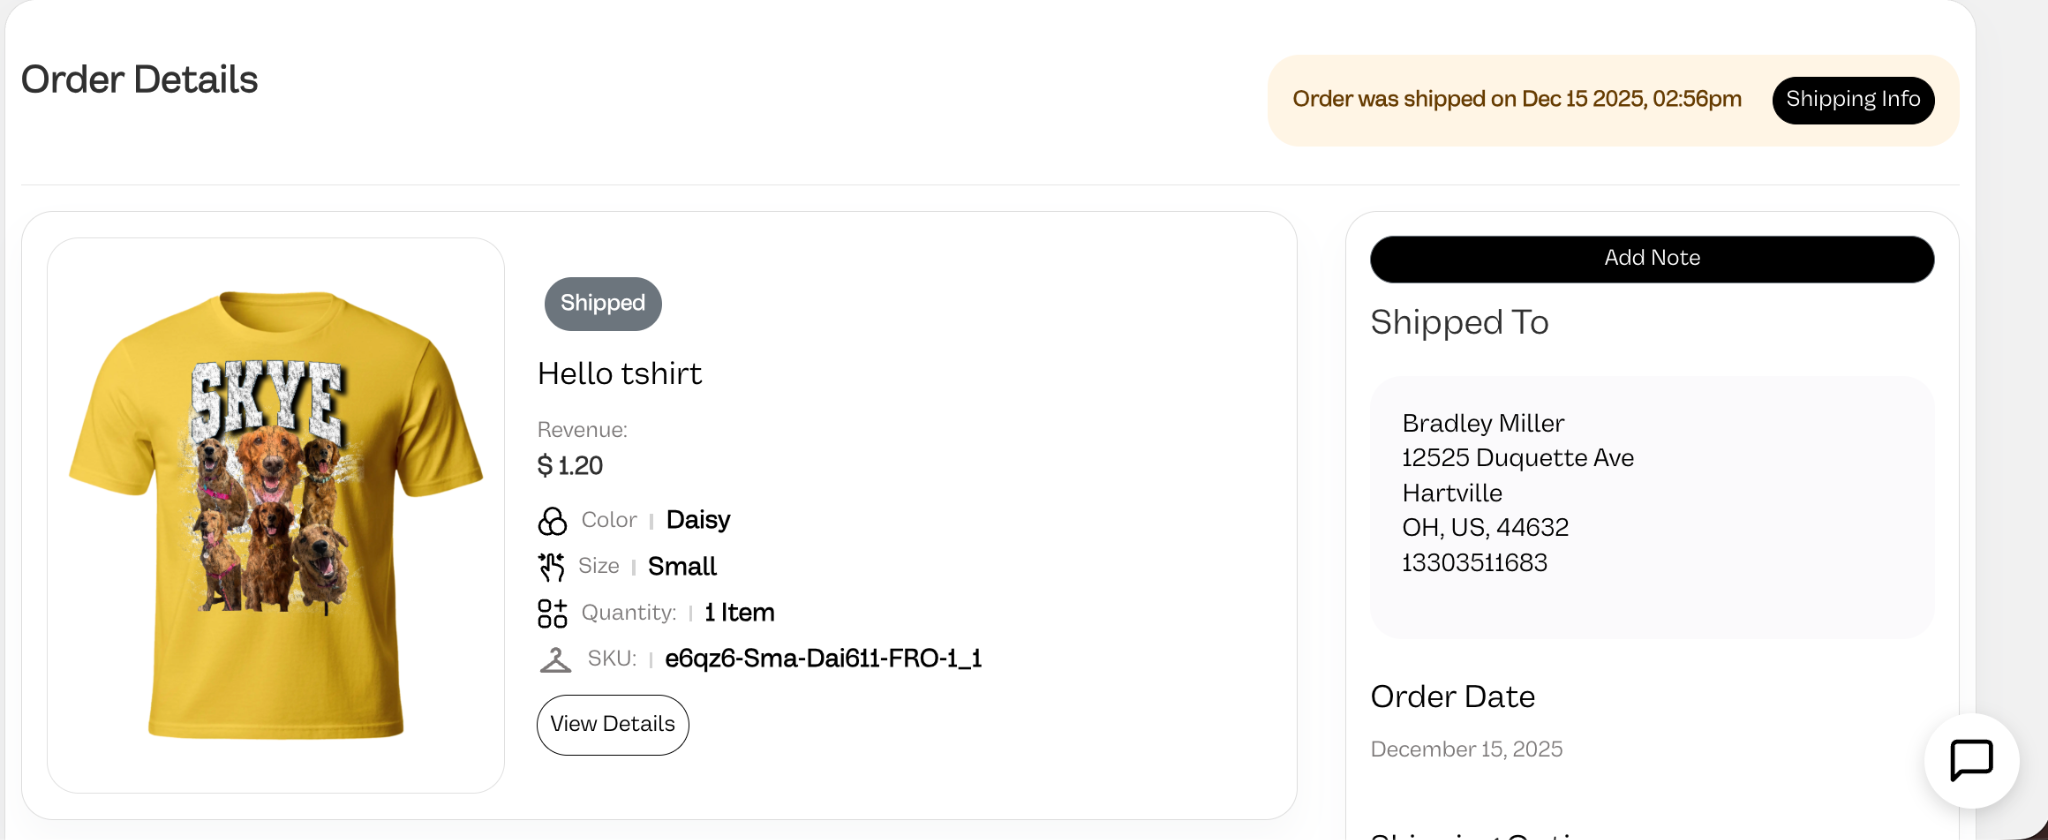
This section shows:
- Customer name
- Full shipping address
- Phone number
- Edit option
If edited:
- New labels will use the updated address
- Existing labels must be voided and recreated
---
Notes
Use Add Note to:
- Leave internal production notes
- Document special requests
- Record issues or adjustments
Notes are stored with the order history.
---
Cancel Order
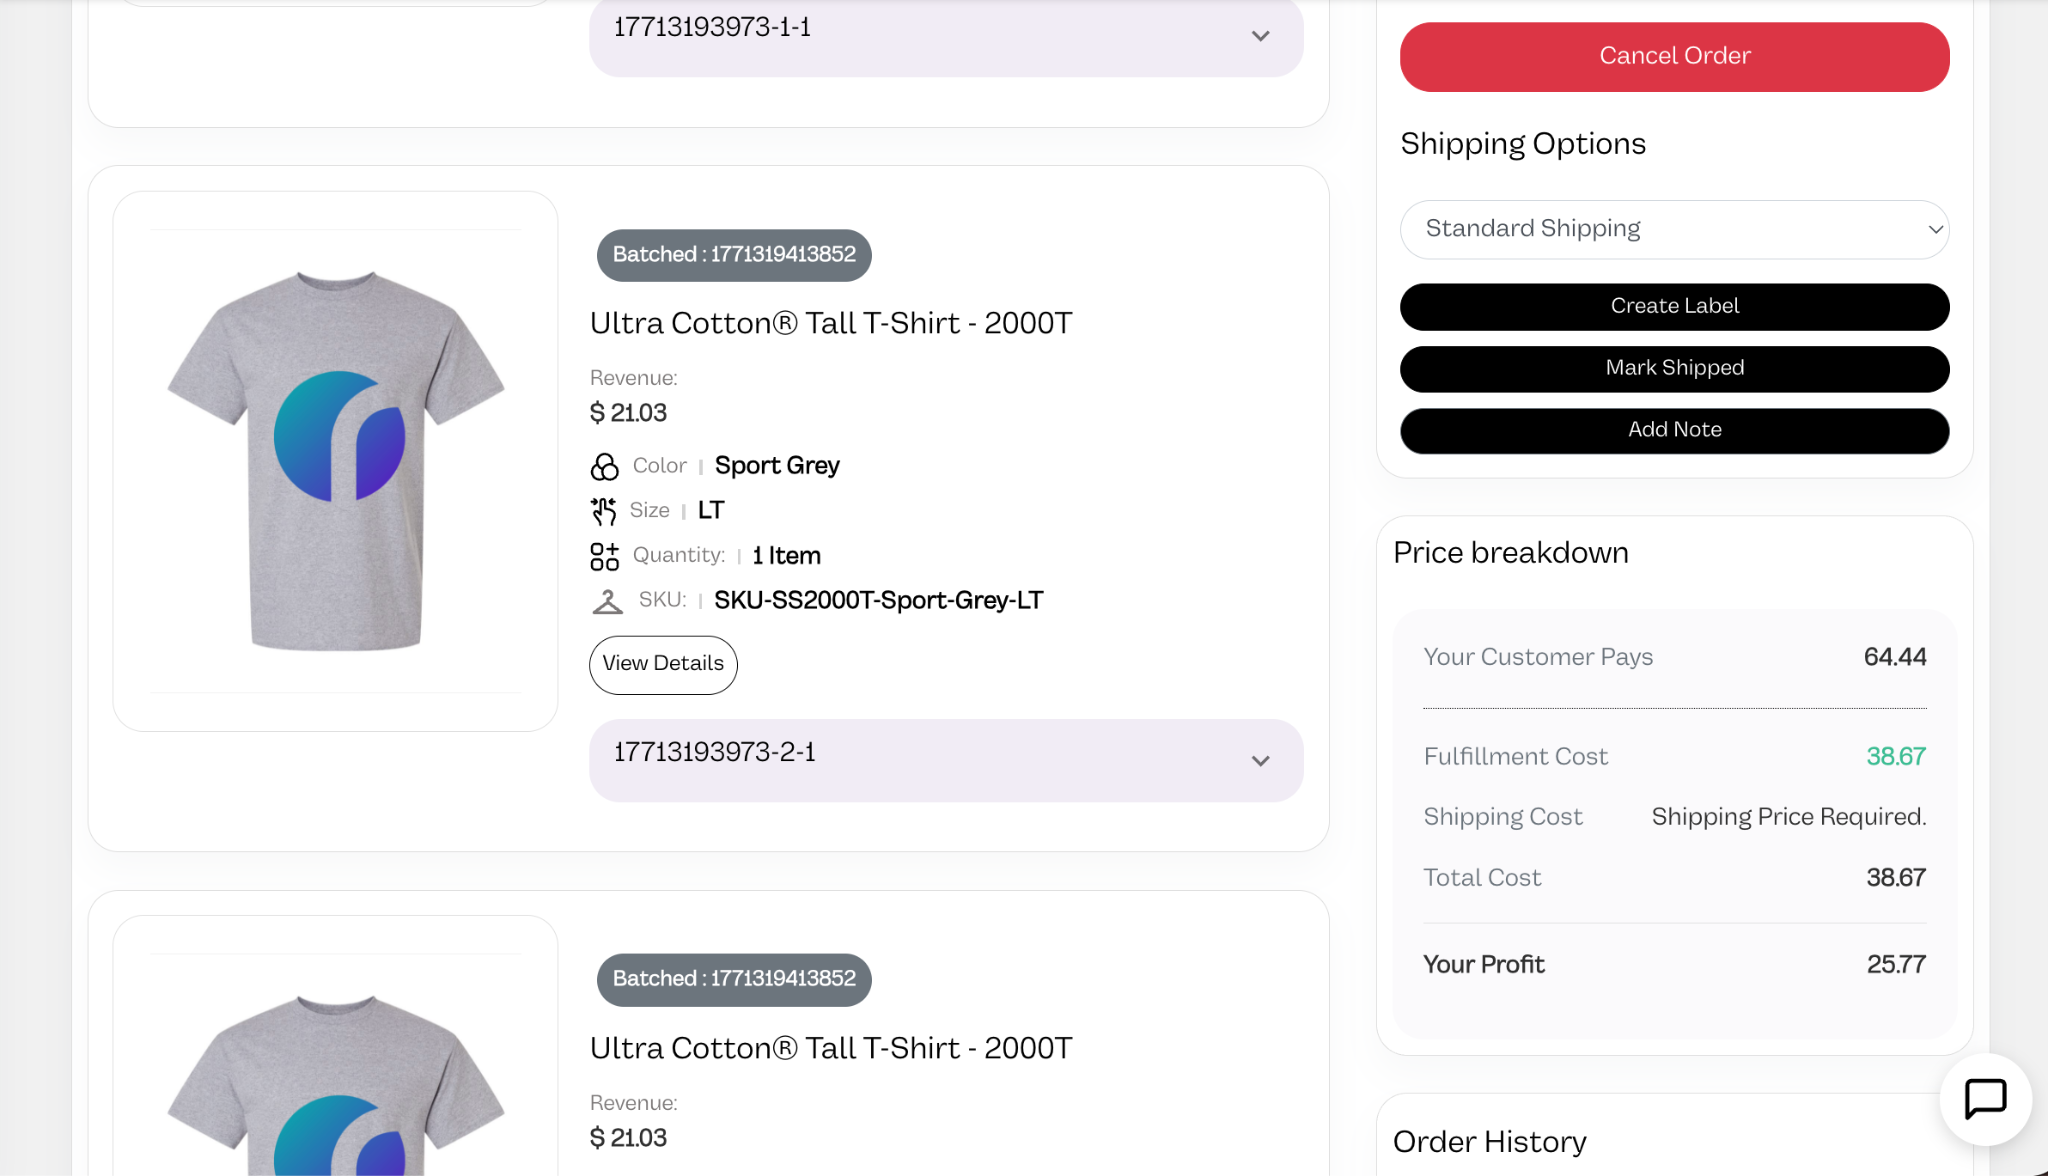
Clicking Cancel Order:
- Stops further processing
- Prevents batching
- May require unbatching if production has begun
Cancelled orders will not proceed to shipping.
---
Viewing Shipping Information After an Order Is Shipped
Once an order has been shipped, the top of the Order Details page will display a confirmation banner such as:
“Order was shipped on [date and time]”
You will also see a Shipping Info button.
---
What You Can View
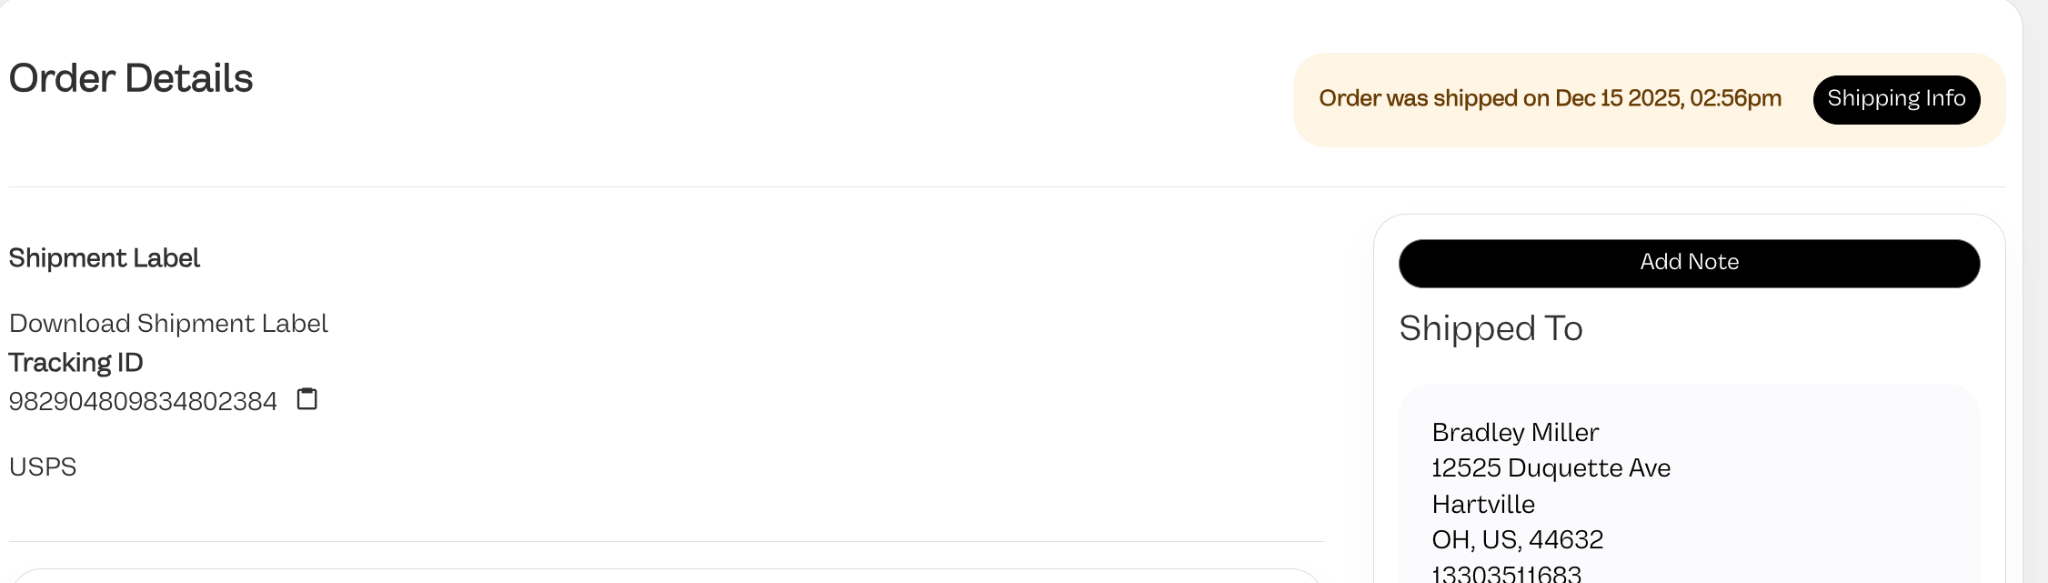
Clicking Shipping Info (or scrolling to the Shipment Label section) allows you to view:
- Tracking ID
- Carrier (USPS, etc.)
- Download Shipment Label link
- Shipping date and time
The tracking number is:
- Stored on the order
- Synced to the connected ecommerce platform
- Used for customer notifications (via the platform)
You can copy the tracking ID directly from this page if needed.
---
Downloading the Label Again
If you need to:
- Reprint the label
- Save it for records
- Share it internally
Click Download Shipment Label to retrieve the original PDF.
This is especially useful if the printer had an issue or a label needs to be reprinted.
---
Important Notes
- Shipping details cannot be edited after label creation.
- If the address was incorrect, the label must be voided and recreated.
- Marking an order shipped manually will not generate a label — it only updates fulfillment status.
---
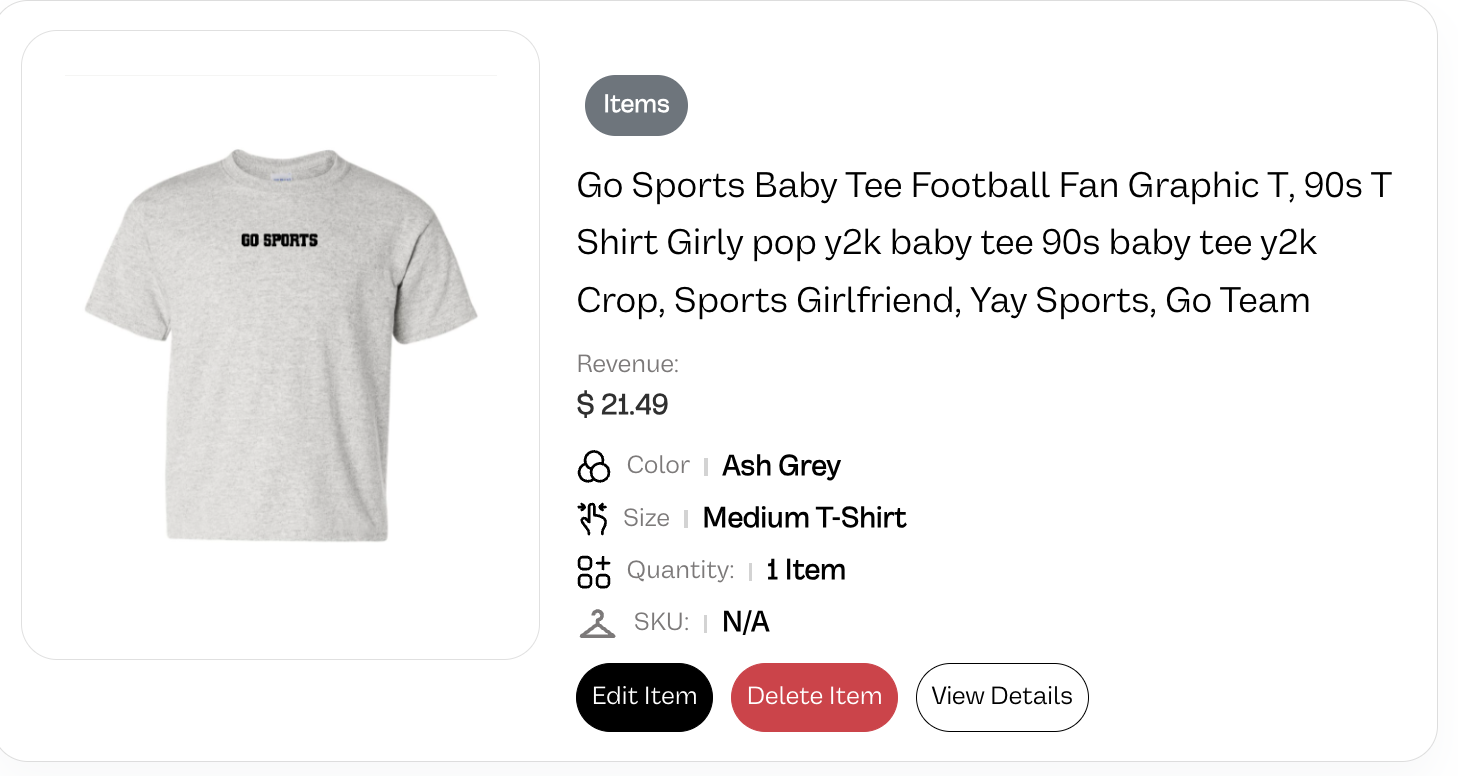
Editing or Deleting an Item (Before Batching)
Items can be edited or deleted only before they are batched.
Once batched, the item is considered in production and can no longer be modified directly.
---
Editing Items
To edit an item:
- Click Edit Item
- The Edit Item modal will appear
[Add Screenshot: Edit Item modal showing Color, Size, Quantity, Attach Printing Images]
Inside this modal, you can:
- Change Color
- Change Size
- Adjust Quantity
- Upload or replace print files
- Update image placement (Front, Back, etc.)
When finished, click Update.
This will:
- Save changes to the order
- Update mapping if necessary
- Keep the order in Pre-production (if not batched)
---
Deleting an Item
If the item has not been batched, you can click Delete Item.
This will:
- Remove the item from the order
- Update totals automatically
- Recalculate revenue and profit
If all items are deleted, the order will effectively become empty and may need to be cancelled.
---
What Happens If the Item Is Already Batched?
If the item shows a Batch ID badge, it cannot be edited or deleted.
You must:
- Unbatch the item (from the Batch page)
- Return it to Pre-production
- Then edit or delete it
Production always takes priority once batching begins.
---
Quick Rule
Not batched = editable
Batched = locked
This prevents production mistakes and ensures fulfillment accuracy.
---
Most Common Questions About This Page
Why can’t I create a label?
Because the order is not yet in a shippable state (items not complete).
---
Why is the order “Unshipped” even though it was batched?
Batching does not equal shipping.
Shipping only updates when a label is created or Mark Shipped is pressed.
---
Why does profit change?
Profit updates after:
- Fulfillment costs are calculated
- Shipping label cost is added